Category: The Lab | Reading Time: 9 Minutes
Urban exploration is a game of variables. You might start your day planning to photograph a small, abandoned general store and end it navigating the sub-basements of a massive psychiatric hospital. The environment can change from a dry, sunlit hallway to a pitch-black, flooded tunnel in a matter of seconds. Because you cannot simply “pop out to the store” once you are inside a location, your backpack—your Go-Bag—is your lifeline.
A common mistake among beginners is overpacking. Carrying 40 pounds of gear through a window and up five flights of decaying stairs will exhaust you quickly, making you clumsy and prone to accidents. The goal of a professional Go-Bag is to be comprehensive yet streamlined. You need exactly what is required to stay safe, stay mobile, and stay out of trouble.
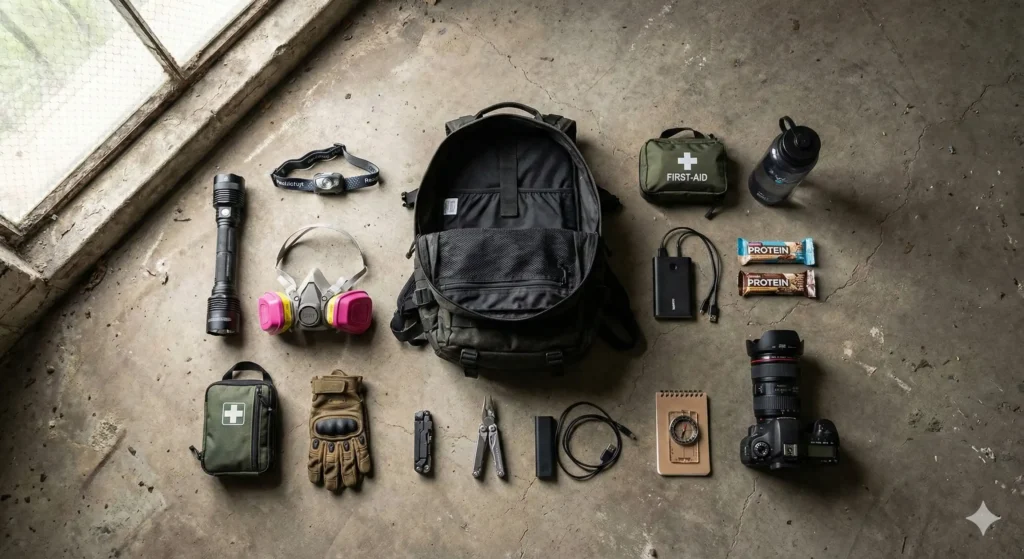
Here is the definitive checklist for the modern urban investigator, broken down into essential categories.
1. The Foundation: The Bag Itself
Before we talk about what goes in the bag, we need to talk about the bag itself. A bright red school backpack is a neon sign for security. You want a bag that is:
- Low-Profile: Dark colors (black, grey, or olive drab) that blend into the shadows.
- Durable: Heavy-duty nylon (500D or 1000D Cordura) that won’t rip when it scrapes against a jagged rusted doorframe.
- Slim-Fitting: Avoid bags with too many dangling straps or “tactical” pouches that stick out far from your body. You need to be able to squeeze through tight gaps without getting snagged.
2. The Primary Lighting System
We’ve discussed flashlights in detail before, but your bag needs a tiered system:
- The Primary Handheld: Your high-candela “thrower” for scanning rooms.
- The Headlamp: Essential for “hands-free” movement. If you are climbing a ladder or crawling, you need your hands to grip while your headlamp illuminates your path.
- The Backup: A small, reliable AAA or AA light. If your primary battery dies or you drop your main light down an elevator shaft, you cannot afford to be in total darkness.
- Spare Batteries: At least one full change for every light you carry.
3. Personal Protective Equipment (PPE)
The environment is hostile to your health. Your bag should always contain:
- P100 Respirator: Stored in a sealed bag to keep the filters fresh.
- Tactical/Work Gloves: To protect your hands from glass shards, rusty metal, and dirty surfaces.
- Hand Sanitizer: You will be touching surfaces covered in lead dust, mold, and bacteria. Never eat a snack during an explore without sanitizing first.
- Safety Glasses: Optional, but highly recommended when exploring industrial sites where things can fall from the ceiling or when walking through thick overgrowth.
4. Navigation and Communication
Technology fails in thick concrete buildings. You need redundancy:
- Power Bank and Cables: Keeping your phone charged is vital for GPS and emergency calls.
- Physical Compass: Simple, reliable, and doesn’t require a satellite signal.
- Personal Marker: A small roll of bright electrical tape or a few “glow sticks.” These can be used to mark your path in complex layouts so you don’t get lost on your way back out. (Note: Always take these with you when you leave to follow the “Leave No Trace” rule).
5. The “Oh No” Kit (Medical & Survival)
You aren’t planning on getting hurt, but you must be prepared for it.
- Individual First Aid Kit (IFAK): Focus on “trauma” rather than “comfort.” You need gauze, medical tape, antiseptic wipes, and a few large bandages.
- Water and High-Calorie Snacks: Exploration is physically demanding. Dehydration leads to poor decision-making. Carry at least one liter of water and a few protein bars.
- A Multi-tool: Useful for a thousand things—from fixing a tripod to pulling a splinter out of your hand. (Note: Avoid carrying large knives or crowbars, as these can be classified as burglary tools).
6. Documentation Gear
This is the “fun” part of the bag, but keep it light:
- Camera and Lens: Usually one versatile zoom lens (like a 24-70mm) is better than five primes.
- Tripod: Lightweight carbon fiber is best. Essential for those long-exposure shots in dark rooms.
- Extra Memory Cards: Nothing ruins a day like a “Card Full” message after three rooms.
7. The Legal “Shield”
In your outer pocket, keep a “Business Card” or a small printed note that explains what you are doing. It should say something like: “Urban Historian / Photographer documenting the architectural history of this site. No intent to vandalize or steal. Will vacate immediately if requested.” This can go a long way in de-escalating a situation with an owner or officer.
Conclusion
Your Go-Bag is a reflection of your experience. As you explore more, you will find yourself removing items you never use and refining the ones you do. Before every trip, do a “Bag Dump.” Empty everything out, check your battery levels, ensure your water is fresh, and verify your respirator filters are clean.
Preparation is the difference between a successful documentation of history and a miserable, dangerous day in the dirt.